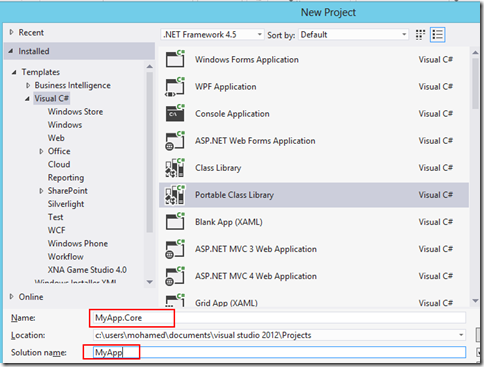
Silverlight 4.0 Tutorial (4 of N): ListBox ItemTemplate
Continuing our RegistrationBooth Application, if you take a look at what we ended with you will find that the attendees data grid that we have is not user friendly, our application should be more attractive to the users, so we will get rid of the data grid and we will use a List box that has a custom template for displaying attendees, in this post we will start using Blend to assist in designing the application UI
- Right click the xaml file in Visual Studio and choose Open in Expression Blend, this will open your solution in Blend.

- Delete the attendeeDataGrid from the Home.xaml file.
- We will change the layout of the form we will use a grid with two columns the width of the first one is about third of the screen width and we will put the list box in this column, and the second column take the remaining screen width and this is where we will put the attendees data form.
- To do this, go to the Objects and Timeline window (if not visible go to Menu Window->Objects and Timeline), select the LayoutRoot Grid, the grid will be highlighted on the design surface (or the art board in the designers lingo), you can see also a small grid icon located in the top left corner of the grid, and you can see two semi-transparent lines one horizontal and one vertical, if you move the mouse over any of these lines, a line will be drawn across the grid and once you click.. a row/column definition will be added to the grid, so you can easily add columns/rows using this way. so we will add a column to this grid, the column should take about the third of the grid width.

- We will move the StackPanel that contains the new attendee data form (dfAttendee) and the button to the right column, to do this select the StackPanel in the Objects and Timeline window, go to the properties window and find the Column property under the Layout category and set it to 1, this will move the StackPanel to the right column.
To easily find properties in the properties window you can use the search textbox in that window which allows you to type any text and the properties window will be filtered to show the properties that start with the text you wrote in the search text box

- To add a ListBox, expand the assets window by clicking on the right arrow located in the bottom of the tools window, drag and drop a ListBox control into the left hand side column

- Select the ListBox, by pressing the “V” key or selecting the Selection tool from the tools window.

- From the tools window, set the Name of the ListBox to be lstAttendees, then right click the ListBox Auto Size->Fill to make the ListBox fills the whole column area.

- To add the data binding, right click the ListBox, select “Data bind ItemsSource to Data…”, the data binding dialog will appear, go to the Element Property tab, select the attendeeDomainDataSource from the scene elements list on the left, and select the Data property from the Properties list on the right.

- If you run the application now, you will find the items in the ListBox is rendered as string that contains the name of the class and the ID, this is because we didn’t specify to the ListBox how we want to render the ListBox Item, to do this we need to set the ItemTemplate property.
- To do this, right click the ListBox Edit Additional Template –> Edit Generated Items (ItemTemplate)-> Create Empty

- In the Create DataTemplate Resource Dialog, name it attendeeDateTemplate, once you click Ok, Blend will allow you to design the DataTemplate which will determine the UI used to display the Attendee object.

- A new empty design surface will be shown that represents the DataTemplate, initially there’s only empty grid as you can in the Objects and Timeline window.

You can go back to the page design by clicking on the Up arrow in the Objects and Timeline window or by clicking on the ListBox name (lstAttendees) in the breadcrumb menu at top of the design surface

- We will create a simple UI for the attendee, where we'll display the image, last name, first name and company, the xaml for the DataTemplate is shown below
- <DataTemplate x:Key="attendeeDataTemplate">
- <Grid d:DesignWidth="320" d:DesignHeight="112">
- <Grid.RowDefinitions>
- <RowDefinition Height="0.3*"/>
- <RowDefinition Height="0.3*"/>
- <RowDefinition Height="0.3*"/>
- </Grid.RowDefinitions>
- <Grid.ColumnDefinitions>
- <ColumnDefinition Width="0.35*"/>
- <ColumnDefinition Width="0.65*"/>
- </Grid.ColumnDefinitions>
- <Image Source="{Binding Path=Photo,Mode=TwoWay, Converter={StaticResource imageConverter}}" Grid.Column="0" Grid.RowSpan="3" MaxWidth="110" MaxHeight="110" />
- <TextBlock Grid.Column="1" Grid.Row="1" TextWrapping="Wrap" Margin="0" HorizontalAlignment="Center" Text="{Binding Company}" />
- <TextBlock Grid.Column="1" Grid.Row="2" TextWrapping="Wrap" HorizontalAlignment="Center" Text="{Binding Email}" />
- <StackPanel Grid.Column="1" Orientation="Horizontal" HorizontalAlignment="Center">
- <TextBlock Margin="0,8" TextWrapping="Wrap" Text="{Binding FirstName}" />
- <TextBlock Margin="0,8,0,16" TextWrapping="Wrap" Text=" "/>
- <TextBlock Margin="0,8" TextWrapping="Wrap" Text="{Binding LastName}" />
- </StackPanel>
- </Grid>
- </DataTemplate>
- Note how the text blocks are bound to the different properties of the Attendee class, and the Image control is bound to the Photo property using the ImageConverter we used before.
- Run the application and see how the list box looks like.

See you in the next post :)
You can download the code from Here
Comments